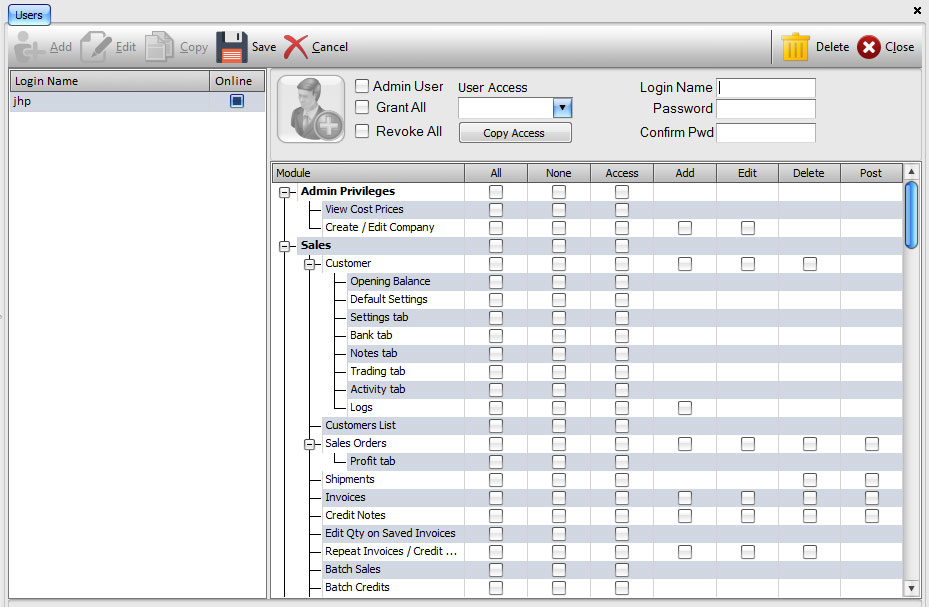
This screen allows you to not only create and add new users to the system, but also define their access rights to the modules within the system.

To add a User
- Click 'Add'. You will see the module list and the user information box become enabled. This symbolises that we can now enter the new users details.
- Enter the 'Login Name'. In the top right hand corner of the user information box you can enter the desired Login name for the new user. The maximum length of the Login Name is 20 characters.
- Enter the 'Password'. Below the Login name field, you can enter the password for the new user. Please note the password will be case sensitive, make sure you type it correctly and using the right case.
- Confirm the 'Password'. In the second Password field, enter the password you have just entered above to confirm it. Remember, the password is case sensitive.
Decide what type of user you want to create. The system allows for 2 types of users, Admin or Normal. An admin user has access to all the modules and can perform any function allowed by the system. A normal user is restricted to what you have chosen too give him access to. Granting all priviledges to user will give him the same rights as a admin user, but the system wouldn't recognise him as a admin user.
- Admin User. Tick the 'Admin User' option or click on the Admin button on the left of the user information box.
- Grant All. Tick the 'Grant All' option to assign access to all the modules for the new user. You will see a tick appear in all columns except 'None' for all the modules.
- Revoke All. Tick the 'Revoke All' option to remove access to all the modules for the new user. You will a tick appear under 'None' for all modules.
- Manual. You can manually go through the modules list giving or denying access to which ever modules you want.
or if you wish, you can assign the same rights as an existing user to the new user your creating:
- Select existing 'User'. Using the 'User Access' drop-down, select the user you wish to copy the rights from.
- Click 'Copy Access'. Click this button to confirm and assign the selected user's rights to the new user. You see the module list be updated to show what the user will/won't have access to.
![]()